Around the Rink

Become a Better Skater by Tuning Your Skate Sharpening
It’s spring time. For hockey players everywhere this means 2 things:
First, it’s time for a well-earned break. While we know there are spring leagues in full effect, for most it’s a time to get away from the ice, maybe pick up a bat and glove or a lacrosse stick, and enjoy the warm weather.
The second thing most hockey players should be thinking about is that this is the time of year to try new things; to experiment a little.
One of the most eye-opening things a hockey player can do is experiment with their skate sharpening. It’s easy, it’s inexpensive and it can make a huge difference in how a player approaches the game and the confidence with which they play.
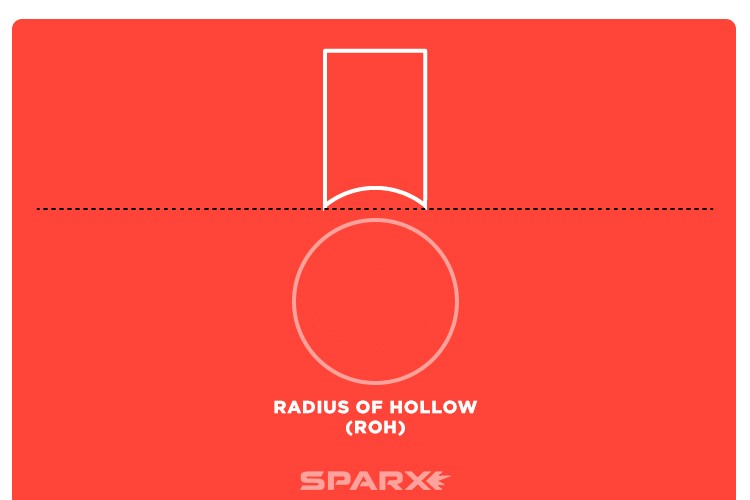
First, let’s define an important term: Hollow.
To create the edges that allow hockey players to propel themselves forward by pushing against the ice surface and then to glide, turn and stop, a groove is created in the bottom of the skate blade. If you turn a skate upside down, hold it at eye-level and look down the blade from heel-to-toe (or vice versa), you can actually see it. This groove is known as the “hollow” and its shape and size can vary significantly.
Shape
Let’s begin with the shape. There are, essentially, 4 options: the typical round radius of hollow (or ROH), and 3 “flat bottom” options.
By far the most popular shape is the rounded hollow derived from the shape of a circle.
The other three options introduce what is called a “flat bottom”. The “Flat bottom Vee” or “FBV” has all straight edges where the “Sparx Fire” and the “BFD” offer radiused sides and a flat bottom.
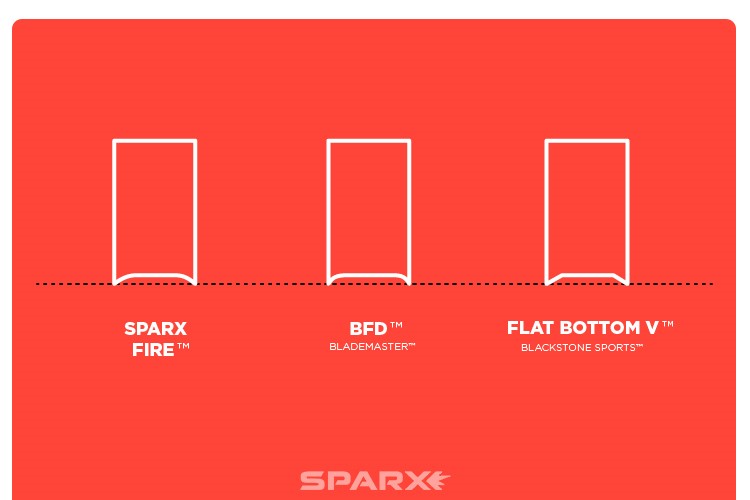
The theory is that by flattening the bottom of the hollow, less of the skate blade will sink beneath the surface of the ice, hence reducing friction and offering more glide with every push.
At Sparx, we have found that fans of the flat bottom sharpening, while small in number, are passionate and swear by this style of sharpening.
Size (or Depth)
For each of the shapes above, there is an array of sizes (see ROH graphic below). When selecting the size of the hollow of your blade you are essentially adjusting the Grip:Glide ratio. Every player wants to feel confident in their ability make sharp turns at top speed and to stop short when necessary, but they also want to get the most speed they can from every push. Finding just the right balance may take a little time, but it is going to be well worth it in the long run.

Profile
The third element that is often overlooked is the “profile” of the skate blade. While the “hollow” relates to the shape of the skating surface (or bottom) of the blade, the “profile” relates to the shape of the “face” or side of the blade.
It’s important to note that the majority of the skate blade is not in contact with the ice at any given moment. Typically, a relatively short section of the blade is touching the ice, this is known as the gliding surface. The section of the blade where the gliding surface is located depends on how the blade was profiled or “shaped” and where the “rocker” is located.
While the details of this (the profile) run deep and are likely the topic of an entirely separate article, here are the basics.
Radius
Like the popular ROH, the profile is also defined using the measurement of Radius. The hollow uses the radius of tiny little circles and the profile uses the radius large circles. The lines below the skate blade in this image represent the arcs of circles with a 9’, 11’, and 13’ radius respectively.
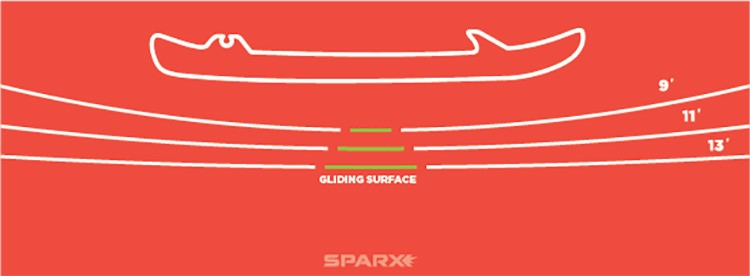
You can see a smaller radius leaves less of the skate blade in contact with the ice, or a shorter gliding surface, while the larger radius results in more of the skate blade making contact with the ice, or a longer gliding surface. The former is more conducive to agility; the larger to straight-ahead speed.
Rocker
It is important to know that you can also control where the gliding surface is located on the skate blade. Moving it towards the toe or towards the heel will have different effects on skating posture.
For most players a “Neutral” or center location will provide the balance needed to comfortably accelerate, pivot, stop and turn. Most skate blades come from the factory with a neutral rocker, though quality control isn’t perfect, so if you want to be certain the rocker on both blades is in the same spot, we recommend getting your blades profiled by a trusted professional.
That covers the basics when it comes to skate sharpening and profiling. We hope it was helpful and we encourage players at every level to take the time this spring or summer to try a different hollow. You might be pleasantly surprised with what you learn.
Submission Guidelines